You have created stunning videos on your device and have shot more than what is required for your project out of enthusiasm. Now, how do you make your project presentable? Here comes the role of video editing. With so many video clips available, the editing process becomes a daunting task for many. But this need not be a matter of concern anymore since you have many tools at your disposal for editing purposes. These tools are available online, and many of them are free. They help you through the process of editing and are user-friendly. These self-explanatory video editing tools will help you boost the quality of videos you have created.
Movie Maker editing tools are easy to use once you know how to use them. These tools are useful both at the professional level or otherwise. Using Movie Maker, you can bring together the various components of the video like audio, video, pictures, music, and transition effects. But, first, you should understand how the Moviemaker interface works to edit your videos professionally. Then, we will look into some of the tips that help you create and edit videos using Movie Maker Online.
Simple recording equipment
First comes the creation stage. Thanks to advancements in technology, smartphones have come a long way from where they started. Spectacular videos can be created from a smartphone itself. There is not much need for expensive professional equipment in many cases since the effects can be brought in through the editing process. The next thing to your smartphone could be your DSLR camera with various components that help in recording wonderful films.
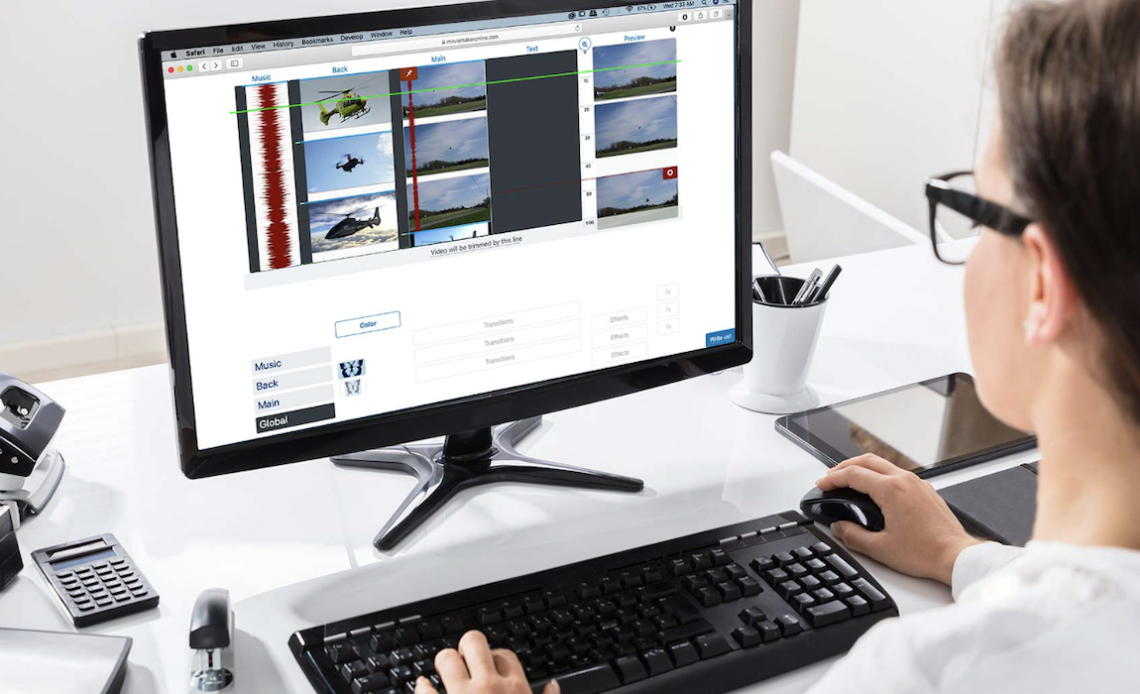
Familiarize with the Moviemaker interface
You have first to understand how the editing tool functions so that you can use the same effectively. It is quite easy to use, and even if you are a new user, you won’t find much difficulty. All you have to learn is about the various tabs on the Moviemaker. Each tab that is present has a function associated. Depending on what you want to create, you can use these tabs.
If you want to add effects to your video, you can do so by visiting the video effects section. You can preview the effect on your clip and then move it over to the storyboard. You can also change the sound in your video if you aren’t satisfied with the original sound you created. The files can be saved to be continued from where you had left them.
Select and import the clips
The content part is gathered here. From the innumerable video clips you have shot, select those that are the best fit for the project and import them to Movie Maker. On the Home tab, you can add videos to the project. If you want to import many video files in one go, press the ctrl key and the files. These clips that you have selected become the basis from which your video project is developed into entertaining films.
Add or change the sound
You have the option to change the sound in your video clip for better engagement. You can select sounds from the drop-down list that contains downloadable music. Background music for your video can also be included through the editing process. If you feel music interrupts what you want to convey, you can add sounds after the video. For this, you should drag the bar to where you want it to begin. Fading the music in places where you want to highlight it, adding voice-overs, etc., are all aspects of making the video very entertaining. Take care to include sound at both the beginning and end of the video to make it look uniform and good.
Trim the videos
A short and crisp video only goes well with people. Nobody has the patience to watch lengthy video clips. So you can’t stuff all you want in your video but have to trim it to include informative and engaging components. Using the Moviemaker editing tool, you can cut short the length of your video. Just click the clip where you want to begin and the one where you want it to end. In between all these, you can add various effects and transitions. Whatever you want to convey is done better when your video is edited efficiently using the best tools.
Take care of the aspect ratio
Don’t be overwhelmed with the term, as employing it in your video is pretty simple. It defines the way your videos will be displayed on the screen. You can choose the preferred ratio from the your Movie Maker editing tool. Also, look into the orientation aspect of the video. Most platforms use a horizontal orientation for videos. So, you can either shoot the videos horizontally or get them edited with the help of the tools to change the orientation.
Adding a title
With the help of Movie Maker, you can add titles and captions to your videos. You can change the style and font of the text and can preview the same in the preview pane before finalizing. The captions can be inserted in the beginning and between various sections of the video. This also helps in achieving the transition effect for your videos.
Transitions and fade effects
You can select animations to be included as transition effects. You only have to select the position where it has to be inserted. The fade-in and fade-out also add beauty to the videos. With all this, you can also choose the playback speed of the video. This too can be done for select parts of your video. While creating transitions and fade effects, keep it to the required minimum. Else it may not be interesting for the viewer.
The final words
Now that you are ready with your final version of the video, check if you need to include anything else to make it more engaging. The video editing tools will make your task easier and help in presenting a video project in a short time. So go ahead and master the skills to keep creating fantastic videos.